当谈到深度学习和机器学习框架时,必定绕不开Tensorflow。作为一个备受欢迎的开源工具,它被广泛用于构建、训练和部署机器学习模型。TensorFlow 由 Google 开发,并于2015年首次发布,它的目标是提供一个灵活、可扩展且易于使用的框架,使研究人员和工程师能够快速开发和部署深度学习模型。
对于移动和嵌入式设备,TensorFlow 提供了 TensorFlow Lite。它是 TensorFlow 的一个轻量级版本,专门设计用于在移动设备、物联网设备和嵌入式系统等资源受限的环境中运行机器学习模型。它的目标是在保持模型性能的同时,提供更小的模型尺寸和更快的推理速度,以满足移动和嵌入式应用的需求。以下是 TensorFlow Lite 的一些关键特点和用途:
轻量级 :TFLite 通过使用量化技术、模型剪枝和模型蒸馏等方法,将深度学习模型的大小大幅减小,以适应资源有限的设备。这有助于减少模型的存储空间和内存占用。快速推理 :TFLite 针对嵌入式设备进行了优化,以实现快速的推理速度。这对于实时应用和响应时间敏感的任务非常重要,如图像识别、语音识别和姿态估计等。硬件加速支持 :TFLite 支持多种硬件加速器,包括GPU、TPU和边缘设备上的专用加速器。这允许模型在加速硬件上运行,进一步提高了推理速度。跨平台兼容性 :TFLite 可以在多个操作系统上运行,包括Android、iOS、Linux和嵌入式操作系统,使其适用于各种移动和嵌入式平台。易于集成 :TFLite 提供了针对多种编程语言的 API,包括Python、C++和Java,使开发者能够轻松集成模型到他们的应用中。量化和转换工具 :TFLite 提供了用于将训练好的 TensorFlow 模型转换为 TFLite 格式的工具,同时还支持量化,这有助于减小模型的尺寸并提高性能。模型兼容性 :TFLite 支持多种类型的模型,包括图像分类、目标检测、自然语言处理和语音处理等。这使得开发者能够在移动和嵌入式设备上部署各种机器学习任务。
源码下载 TFLite是Tensorflow的子模块,源码也放在Tensorflow当中,可以直接从Github上下载。Git使用如下命令克隆到本地:
1 git clone https://github.com/tensorflow/tensorflow.git
程序编译 Tensorflow的编译不是一件简单的事情,本人踩了很多坑,这里记录一下编译过程,避免后人踩坑。
Tensorflow提供了CMake和Bazel两种编译途径,这里强烈推荐使用Bazel编译 ,这也是官方推荐。CMake虽然有时也能编译成功,但是维护程度没有Bazel好,更容易编译失败。
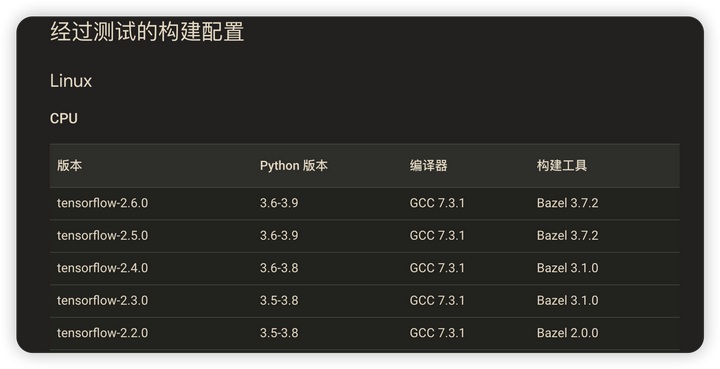
💡 Tensorflow的版本跟Bazel是存在版本对应关系的,官方只会测试少部分指定的版本。
这里强烈建议使用Bazelisk,它能够自动识别编译所需要的Bazel并自动下载切换到对应的版本。使用方法也很简单,从Github上下载Release,重命名成bazel(Windows下是bazel.exe)并添加到环境变量当中即可。
Windows平台编译 环境依赖:
VC2019:在WIN平台编译需要准备VC编译环境,这里本人使用VC2019,因为Tensorflow使用的C++标准库比较新,使用旧版本VC可能会无法编译。
Git Bash:编译时需要Bash来执行某些脚本,因为Win本身不支持bash,所以需要借助Git Bash
Python+Numpy模块
Lite编译步骤:
💡
**一定要使用CMD!一定要使用CMD!一定要使用CMD!不要使用PowerShell**
进入到源码目录,先生成编译配置,选项看自己需要来选。
在编译之前设置好编译变量,建议设置好Git Bash路径和VC路径,避免编译找不到这两个。
1
2
set BAZEL_SH=D:/Program Files/Git/bin/bash.exeset BAZEL_VC=D:\\Program Files (x86)\\Microsoft Visual Studio\\2019\BuildTools\\VC
编译需要能上外网,否则很多源码无法下载。
使用以下命令进行编译,-c opt表示编译Release版本,有需要可以改成DEBUG版本。
1 bazel build -c opt --config=mkl //tensorflow/lite:tensorflowlite
编译好之后在\bazel-out\x64_windows-opt\bin\tensorflow\lite文件下可以找到tensorflowlite.dll和tensorflowlite.dll.if.lib,这就是我们需要的tensorflow动态库文件。
FLex编译步骤: 并不是所有的模型都能转Lite格式,默认的Lite只支持少量的算子,如果想要复杂的算子需要使用Flex委托,官方关于这部分的解释如下
Flex的编译也是只需要一行命令,但是需要注意的是,编译Flex需要编译Tensorflow的核心库,需要非常久的时间,建议有条件放到多核编译机上编译。
1 bazel build -c opt --config =monolithic tensorflow/lite/delegates/flex:tensorflowlite_flex
编译完成后可以在\bazel-out\x64_windows-opt\bin\tensorflow\lite\delegates\flex 目录里找到tensorflowlite_flex.dll和tensorflowlite_flex.dll.if.lib
Linux平台编译 环境依赖:
GCC:建议使用高版本的GCC进行编译,对C++14、17支持的版本最佳
Python+Numpy模块
编译步骤: Linux环境下的编译比较简单,先生成编译配置,再编译
1
2
3
python .\configure.py bazel build -c opt --config =mkl //tensorflow/lite:tensorflowlite bazel build -c opt --config =monolithic tensorflow/lite/delegates/flex:tensorflowlite_flex
程序调用 调用需要用到Tensorflow Lite C++ API,通过文档可以查询到api接口及其功能。
TensorFlow Lite C++ API Reference
头文件 调用需要用到tensorflow和flatbuffers的头文件,tensorflow就使用源码文件夹,flatbuffers的头文件在路径bazel-out\x64_windows-opt\bin\external\flatbuffers\_virtual_includes\flatbuffers中可以找到,Linux在类似的目录。
调用主要使用这3个头文件
1 2 3 #include "tensorflow/lite/interpreter.h" #include "tensorflow/lite/kernels/register.h" #include "tensorflow/lite/model.h"
加载模型 1 2 std::unique_ptr<tflite::FlatBufferModel> model = tflite::FlatBufferModel::BuildFromFile ("../model/lstm_1mon_5s.tflite" );
创建解释器 1 2 3 4 5 6 7 8 9 tflite::ops::builtin::BuiltinOpResolver resolver; std::unique_ptr<tflite::Interpreter> interpreter; tflite::InterpreterBuilder (*model, resolver)(&interpreter); if (interpreter->AllocateTensors () != kTfLiteOk) { std::cerr << "Failed to allocate tensors." << std::endl; return 1 ; }
输出模型信息 tflite模型文件包含了推理所需要的尺寸信息,可以将其输出出来便于错误检查。
1 2 3 4 5 6 TfLiteTensor* input_tensor = interpreter->input_tensor (0 ); TfLiteTensor* output_tensor = interpreter->output_tensor (0 ); const int input_tensor_size = input_tensor->bytes / sizeof (float );
填充推理数据 1 2 3 4 float * input_data = interpreter->typed_input_tensor <float >(0 );for (int i = 0 ; i < N; ++i) { input_data[i] = 0.5f ; }
运行模型推理 1 2 3 4 5 if (interpreter->Invoke () != kTfLiteOk) { std::cerr << "Failed to invoke interpreter." << std::endl; return 1 ; }
获取输出数据 1 2 float * output_data = interpreter->typed_output_tensor <float >(0 );
完整的Demo如下
1 2 3 4 5 6 7 8 9 10 11 12 13 14 15 16 17 18 19 20 21 22 23 24 25 26 27 28 29 30 31 32 33 34 35 36 37 38 39 40 41 42 43 44 45 46 47 48 49 50 51 52 53 54 55 56 57 58 59 60 61 62 63 64 65 66 67 68 69 70 71 72 73 74 75 76 77 #include <fstream> #include <iostream> #include <string> #include <unordered_map> #include <vector> #include "tensorflow/lite/interpreter.h" #include "tensorflow/lite/kernels/register.h" #include "tensorflow/lite/model.h" void loadModelAndRunInference (const std::string model_path, const int time_step, std::vector<std::vector<float >> &indata, std::vector<float > &outdata) if (!indata.size ()) { std::cerr << "输入数据不能为空" << std::endl; return ; } if (indata[0 ].size () < time_step) { std::cerr << "输入数据量小于样本时间步长" << std::endl; return ; } auto model = tflite::FlatBufferModel::BuildFromFile (model_path.c_str ()); if (!model) { std::cerr << "Failed to load model." << std::endl; return ; } tflite::ops::builtin::BuiltinOpResolver resolver; std::unique_ptr<tflite::Interpreter> interpreter; tflite::InterpreterBuilder (*model, resolver)(&interpreter); if (!interpreter) { std::cerr << "Failed to construct interpreter." << std::endl; return ; } if (interpreter->AllocateTensors () != kTfLiteOk) { std::cerr << "Failed to allocate tensors." << std::endl; return ; } TfLiteTensor* input_tensor = interpreter->input_tensor (0 ); TfLiteTensor* output_tensor = interpreter->output_tensor (0 ); int input_tensor_size = input_tensor->bytes / sizeof (float ); std::cout << "输入数据大小为:" << input_tensor_size << std::endl; const int vec_num = indata.size (); for (int n = 0 ; n < indata[0 ].size () - time_step; n++) { float * input_data = interpreter->typed_input_tensor <float >(0 ); for (int i = 0 ; i < time_step; ++i) { for (int j = 0 ; j < vec_num; ++j) { input_data[i*vec_num+j] = indata[j][n+i]; } } if (interpreter->Invoke () != kTfLiteOk) { std::cerr << "Failed to invoke interpreter." << std::endl; return ; } float * output_data = interpreter->typed_output_tensor <float >(0 ); outdata.push_back (*output_data); } }
Flex调用 官方申明,只要链接了共享库,在运行时创建解释器时,就会自动安装必要的 TfLiteDelegate。不需要像其他委托类型通常要求的那样显式安装委托实例。
在Linux平台中,只需要使用--no-as-needed来强制链接tensorflowlite_flex.so即可,CMake脚本如下
1 2 3 4 5 6 7 8 9 10 11 12 13 14 15 16 17 18 19 20 21 22 23 24 25 cmake_minimum_required (VERSION 3.11 )project (predict)set (CMAKE_CXX_STANDARD 11 )include_directories ( /home/airchaoz/miniconda3/envs/tflite/lib/python3.8 /site-packages/tensorflow/include /home/airchaoz/repository/tf_lite/library/lite/include /home/airchaoz/repository/tf_lite/tensorflow ) add_compile_options ("-g" )# 添加动态 set (LINK_DIR /home/airchaoz/repository/tf_lite/library/lite/lib/)add_executable (predict src/main.cpp )link_libraries (${LINK_DIR}/libflatbuffers.a)target_link_libraries (predict ${LINK_DIR}libtensorflowlite.so)# 强制链接整个库 target_link_libraries (predict -Wl,--no-as-needed ${LINK_DIR}libtensorflowlite_flex.so -Wl,--as-needed )
在Win平台中,找不到强制链接的选项,这里使用手动加载的方式实现